
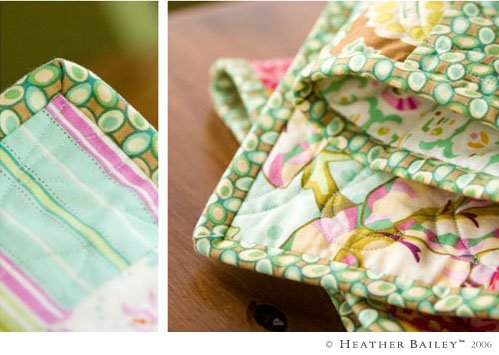
It’s Tute time again. I’ve put together a printable one-sheet on how to bind a quilt with continuous binding. Please don’t give your next quilt hokey corners, like I used to, just for fear of trying something new. When my mom first offered to show me this technique, I completely blew her off. It wasn’t until I saw the glorious mitered corners that resulted that I got on board. I’ve never looked back.
You can cut quilt-binding strips with the grain of the fabric or on the bias. Bias-cut bindings are most-enduring if your quilt is to be used and laundered frequently. And, a bias binding is necessary for quilts or projects with irregularly-shaped edges (scallops, rounded corners, etc.). There’s a neat trick for prepping bias binding, where you sew your fabric into a tube before cutting it into binding-strips. This technique is not in my instructions, but here is a link to walk you through it.
Instead, I show you how to attach a binding along the edge of your quilt in such a way that you can achieve glamorous corners too. Remember – no fear! And, feel free to print yourself a copy to keep handy for your next quilting adventure.
For the Continuous Quilt-Binding Tutorial, click here. Or visit the “Continuous Quilt Binding” link under Freebies at www.HeatherBailey.com.
Your tutorials are amazing! I have to thank you for the headband tutorial since I gave that a try over the weekend and absolutely love my new headband. I want one in colors to match every outfit. LOL The tutorial was so easy to follow. I can not WAIT to buy your new patterns. 🙂
Oh my gosh, bless you! I have two quilts in need of binding, but I’ve been putting it off out of fear. This tutorial is a lifesaver….or a quiltsaver!
Yes, thank you so much. I tried it on my last blanket (that’s also how Denyse Schmidt does it) and it was so easy and neat! I printed your instructions in color to add to my binder!
as ever, thank you so much Heather for your tutorials – love the fact that this is an easy to print off PDF.
Thank you so much, mam! (smiles) I am soooo excited to learn this technique. I have botched many a fine quilt with ugly corners, like you mentioned. I can’t wait to give it a try! I’m stalking the mailbox for some fabrics…..gonna start on a quilt for our bed! Yay! I LOVE your new fabrics. Can’t wait ’til they come out!!!
It’s like you were speaking just to me. I looked up alternates to the ugly corner technique a couple of weeks ago, and lost my nerve before I’d even finished reading the instructions. I’m goin’ back in – NO FEAR! ;0) Thanks for your time & generosity!
Aren’t mitered corners the best?!? My mom taught me years ago and I’ve never looked back–but I’m glad you included how to finish the binding ends in your tutorial. I can never seem to get that quite right. Thanks!
I use this technique and I love it!! It makes such a nice lovely edge. Great job on your tutorial!
I have done this for quiet a few years now. It was taught to me at a round robin at the Utah Valley Quilt Guild. Only they didn’t have a hand out just had to take good notes and remember. Very nice job on this and all your tutorials.
Take care
Sunshine
http://sunshinescreations.blogspot.com/
What! Hokey Corners! Who? Me? So you’ve seen my quilts? I am SO going to use this tutorial. A million thank you’s!
Oh goodie! I have promised my mother that I will be making her a small quilt for her bed (just a little one) and I’m panicked at the thought of the whats and hows of it all. This helps me out a bit. 🙂
Thank you so much! I’ve been wanting to make a quilt but not exactly sure about the quilt binding and how to get it to come out nice…thank you so much! I’m anxiously awaiting your fabric to come to the fabric store near me!
This is so great – thanks!
Thanks! I am sending this to a couple of my sisters (who btw never has binding that looks this great!)
Ooh, the fabric is gorgeous!
goodness…even your pdf documents are cute!!
I enjoyed your tutorials! I am just a newbie in sewing, but I”m already loving it!
Ruh roh!!!
That was the most recent – and last – excuse I had been using in the delay of starting my first quilt!
THANKS A LOT! 😉
I think they do (and hopefully will when I dp them too) look GREAT!
~gyl
Lord, your fabrics are gorgeous.
Your creations are so amazing that they make we want to sew! I’ve made two quilts in my lifetime, but I don’t think you could really classify them as quilts. Not in the traditional sense. My corners were nothing as professional as yours. I think I’ll stick to painting and admire from afar! Beautiful fabrics!
Oh, all right, I’ll learn to do it the right way. Thanks for the help!
Brilliant tutorial. Thank you Heather.
And I LOVE your fabrics, I’m hoping they are going to be available in the UK ?
xxx
Thank you for the binding tutorial–very helpful and much needed.
I just came across your headband pattern and I am dying to make one! I love the little girl clothes that you designed and the amazing fabrics! I can’t wait till your patterns come out and I can make something for my little girl!!!
Just when I was almost ready to bind my first quilt, and was wondering how exactly to do that… Thank you for showing how it’s done – now I have my motivation back to finish it!
Thanks too! I will print it and keep it! I don’t quilt, but we never know about the future!
thank you so much for this tutorial–it helped me finish up my latest project. It’s on my blog if you’e interested.
I love your site! I do have a question though. What material do you like the best for paper piecing?
The data or shall we say the information discuss above is really a relevant one. Looking forward for more regarding this.
I have quilt like project I need to work on and this is such a comprehensive tutorial thanks a bundle.
http://nicoleisthenewblack.blogspot.com/
Is there anywhere I can still get the PDF? I used to have a printed copy and then I lost it.
Link is invalid for me..